How to Attach Live Moss to Wood, Rocks, and Other Terrarium Accents
How to Attach Live Moss to Wood, Rocks, and Other Terrarium Accents

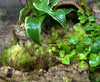
Choosing the Right Moss
Not all mosses attach and grow well on hard surfaces. Some of the best options include:
-
Java Moss (Taxiphyllum barbieri) – Excellent for humid, water-rich environments.
-
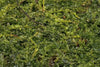
Hypnum Moss (Hypnum cupressiforme) – Forms a soft, green carpet on wood and rocks. See care sheet for info about this specific moss.
-
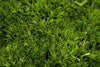
Plagiomnium Moss (Plagiomnium spp.) – Thrives in high humidity and spreads well. See care sheet for info about this specific moss.
-
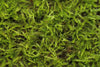
Cushion Moss (Leucobryum glaucum) – Ideal for drier setups with periodic misting. See care sheet for info about this specific moss.
Choosing the right moss for your terrarium’s conditions will help ensure long-term success.
Preparing the Surface
To improve moss attachment, follow these preparation steps:
-
Clean the Surface – Remove any debris, algae, or dirt from the wood, rock, or terrarium accent to ensure better adhesion.
-
Soak the Moss – Hydrate the moss by soaking it in dechlorinated or reverse osmosis (RO) water for about 10 minutes. This makes it more pliable and easier to attach.
-
Moisten the Surface – Lightly mist the wood or rock before applying the moss to encourage immediate adhesion.
Attachment Methods
There are multiple ways to attach moss to different surfaces. The best method depends on the type of moss and the material you're attaching it to.
1. Fishing Line or Cotton Thread Method
Best for: Driftwood, branches, or porous rocks.
-
Place small clumps of moss onto the surface.
-
Use a thin fishing line or biodegradable cotton thread to wrap around the moss and secure it in place. Do not use braid as it can harm your animals, Monofilament or Fluorocarbon line is recommended.
-
Over time, the moss will naturally attach to the surface, and the thread can be removed (or will biodegrade, depending on material you are using).
2. Super Glue Method
Best for: Rocks and hardscape decorations.
-
Use aquarium-safe or cyanoacrylate-based super glue.
-
Apply a small amount to the surface and press the moss into place.
-
Hold for a few seconds until the glue sets. Mist lightly to keep the moss hydrated.
3. Slurry or Paste Method
Best for: Large coverage areas on porous surfaces.
-
Blend moss with water and a small amount of buttermilk or yogurt to create a paste.
-
Spread the paste onto wood or rocks.
-
Keep the area consistently moist, and the moss will gradually take hold and grow.
4. Mesh or Netting Method
Best for: Vertical backgrounds or large logs.
-
Place moss against the surface and cover it with fine mesh or plastic netting.
-
Secure the mesh with pins or zip ties.
-
Once the moss establishes itself, remove the mesh.
Caring for Attached Moss
Once the moss is attached, proper care is essential for healthy growth:
-
Humidity & Misting – Mist the moss regularly to keep it from drying out.
-
Lighting – Provide indirect light or full-spectrum grow lights for optimal growth. Be sure the moss is not exposed to too much light.
-
Trimming – Occasionally trim overgrown moss to maintain shape and encourage spreading.
-
Patience – It may take weeks for moss to fully attach. Be patient and keep the environment stable.

Final Thoughts
Attaching live moss to wood, rocks, and terrarium accents is a simple way to create a stunning bioactive habitat. With the right moss, proper attachment methods, and consistent care, your terrarium can thrive with lush greenery.
Looking for high-quality moss and bioactive supplies? Check out The Bio Dude’s Moss Collection for premium, live moss varieties perfect for your setup!
Stay bioactive, stay thriving!
- The Bio Dude Team
- Josh Halter